Introduction to Texture Paint
Texture paint, a versatile and innovative product, adds a distinct aesthetic quality to walls, making it a popular choice among homeowners and professional decorators alike. Unlike standard paint, which typically offers a flat appearance, texture paint incorporates various materials and techniques that contribute to surface depth and complexity. This uniqueness allows it to transform ordinary walls into eye-catching features within a space.
There are numerous finishes available when it comes to texture paint, ranging from subtle and understated to bold and dramatic. Some common types include knockdown, skip trowel, and stucco, each providing its own visual character. These decorative techniques not only enhance the ambiance of a room but also allow for creative expression, adapting to various interior design themes. Moreover, texture paint serves functional purposes; it can effectively conceal wall imperfections, such as cracks and blemishes, thereby improving the overall appearance without the need for extensive repairs.
Texture paint is not limited to interior applications; it is equally suitable for exterior surfaces, enabling homeowners to enrich the curb appeal of their properties. Whether applied to siding, fences, or garden walls, texture paint can contribute to increased durability against weather elements while maintaining an attractive aesthetic. The flexibility of texture paint also allows for its use in diverse settings, including residential homes, commercial spaces, and outdoor structures.
As we delve deeper into the world of texture paint, this guide will arm you with the knowledge to select the right products, apply them effectively, and achieve stunning results that can significantly enhance your living spaces. Understanding the versatility and advantages of texture paint will empower you to make informed decisions in your home decors projects.
Types of Texture Paint
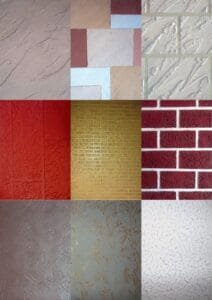
Texture paint offers a diverse range of finishes that can enhance the visual appeal of interior and exterior walls. Among the most popular types of texture paint are sponge, brush, and knockdown textures, each possessing distinct characteristics and application techniques.
Sponge texture is often appreciated for its versatility and subtlety. This type of finish is created using a sponge to dab the paint onto the wall, resulting in a soft, mottled effect. The application is relatively straightforward and allows for personalized patterns. It is ideal for areas such as living rooms and bedrooms, where a warm ambiance is desired. Due to its inviting aesthetics, sponge texture paint is especially favored in residential applications.
In contrast, the brush texture yields a more pronounced look, making it suitable for both traditional and modern settings. This texture is generated by using a stiff-bristled brush to apply paint in varied strokes. The result is a linear or sweeping appearance which can add depth and character to walls. This finish is commonly utilized in high-traffic areas such as hallways and kitchens, as it can effectively conceal imperfections.
Knockdown texture is characterized by its unique, rough surface and is produced through a two-step process. Initially, a thick layer of joint compound is sprayed onto the wall, and once it dries, it is lightly knocked down using a trowel. This technique creates a textured surface that can effectively hide flaws while offering a stylish design element. Knockdown texture is frequently used in ceilings and accent walls, providing both durability and an aesthetically appealing finish.
The choice of texture paint is essential for achieving the desired ambiance in a space. Each type of texture paint has its specific applications and benefits, making it crucial to analyze these options to determine which best suits your project needs.
Necessary Tools and Materials
Applying texture paint on walls requires specific tools and materials to ensure a successful outcome. A well-prepared workspace equipped with the right items enhances both the efficiency and quality of the painting process. Below is a comprehensive list of necessary tools and their respective functions.
First and foremost, a high-quality roller is essential for applying texture paint evenly across large wall areas. Opt for a roller with a thick nap, as this will help to collect and distribute the paint more effectively, creating the desired texture. For detailed edges and corners, a brush with stiff bristles will provide precision and control, allowing for a clean finish.
A texture sprayer can significantly speed up the application process, particularly for larger projects. These sprayers create a uniform texture and can be adjusted to achieve various finishes. When choosing one, ensure it is compatible with the type of texture paint selected.
To protect surrounding areas and maintain a tidy workspace, painter’s tape is invaluable. This tape should be applied along edges and trim to create sharp lines, preventing any paint from seeping onto unwanted surfaces. Additionally, using drop cloths is crucial to safeguard floors and furniture from drips and spills during the application.
Different types of texture paint are available, including knockdown, slap brush, and popcorn styles, among others. Each type offers unique finishes, allowing for customization based on aesthetic preferences. Selecting the appropriate paint type will be instrumental in achieving the desired look for the walls.
Finally, having a ladder handy is important when working on high walls or ceilings, ensuring safety and accessibility throughout the painting process. In conclusion, gathering these essential tools and materials will facilitate an efficient and effective texture painting experience, leading to satisfying results.

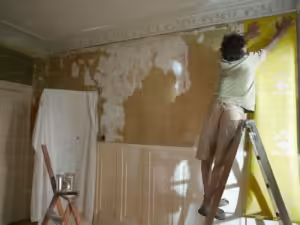
Prepping the Walls for Texture Paint
Proper preparation of walls is crucial for a successful texture paint application. Before embarking on this transformative project, it is important to ensure that the walls are clean and in good condition. Begin by removing any dust, dirt, or grease that may have accumulated on the wall surfaces. This can be accomplished using a mild detergent mixed with water and a soft cloth or sponge. For tough stains, a mixture of vinegar and water or a specialized cleaner may be required. It is critical that the walls are completely clean, as this will facilitate better adhesion of the texture paint.
Once the surfaces are cleaned, inspect them thoroughly for any damages such as cracks, holes, or peeling paint. These imperfections must be addressed to create a smooth foundation for the texture paint. Use spackling compound or a suitable wall filler to repair small holes and cracks. For larger damages, consider using joint compound or a patching material for a more robust fix. After repairs are completed, sand the patched areas gently to create an even surface that blends with the surrounding wall.
After ensuring the walls are clean and repaired, the next step is to apply a primer. This is an essential part of the prep work, as the primer not only enhances the paint’s adherence but also prevents moisture from affecting the texture paint. Choose a primer that is compatible with the texture paint you intend to use. Apply the primer using a roller for large areas and a brush for corners and edges, ensuring even coverage.
Lastly, adequately protect adjacent areas, such as trim, baseboards, and flooring. Use high-quality painter’s tape to mask off these regions, preventing any accidental damage or overspray during the painting process. Taking the time to thoroughly prepare the walls will significantly contribute to a smooth application and a better final result, setting the stage for the remarkable finish that texture paint can provide.
Step-by-Step Application Process
Applying texture paint to walls can transform a plain surface into a visually striking feature of the room. To achieve the best results, it’s essential to follow a methodical approach. Below is a detailed guide to the step-by-step application process.
Begin by preparing the workspace. Remove any furniture or cover it with drop cloths to protect it from paint splashes. Ensure that the area is well-ventilated. Next, inspect the walls for any imperfections such as cracks or holes. These should be patched with a suitable filler and sanded smooth once dry, creating an even surface for the texture paint.
Before mixing your texture paint, choose the right type that suits your aesthetic and functional needs. Options include acrylic, latex, or oil-based textures. Follow the manufacturer’s instructions for mixing the paint, ensuring that consistency is achieved without lumps. It’s advisable to do a small test patch on the wall to see how the texture looks once applied.
When you’re ready to paint, apply a coat of primer over the walls. This will help the texture paint adhere better and ensure an even finish. Once the primer is dry, begin applying the texture paint using a roller or a brush, depending on the desired effect. Start in one corner of the room and work your way across the wall in sections. While the paint is still wet, use texture tools like a sponge, comb, or brush to create the desired pattern. Be mindful of excess paint collecting in certain areas, as this can affect the final look.
After completing the initial coat, allow it to dry completely. Inspect the wall for any areas that may require touch-ups or additional texture. Once satisfied, clean your tools and remove any protective coverings from the furniture. When embarking on a texture painting project, following these steps will help ensure a professional-looking finish.

Expert Tips for a Flawless Finish
Achieving a professional-looking finish with texture paint involves careful planning and execution. One of the first steps is to choose the right color and texture that complement the existing decor. Opt for colors that harmonize with your room’s palette, as this ensures a cohesive look. Consider using a sample patch on the wall to see how light affects the texture and color choice at different times of the day. This practice will help you visualize the end result before committing to a full application.
When it comes to applying texture paint, timing is critical, especially if you are layering different textures or colors. It is essential to allow adequate drying time between coats; otherwise, you risk damaging the underlying layer. Manufacturers typically provide specific drying time guidance on the product label, which should be strictly followed. Applying the second coat too soon can lead to uneven surfaces or an incomplete finish.
Techniques for blending textures can also significantly influence the overall appearance. When combining different textures, consider using a sponge or brush to soften the edges where the textures meet. This technique helps achieve a seamless transition, avoiding stark contrasts that may detract from the visual appeal. Additionally, experimenting with tools such as rollers, trowels, or stencil brushes can provide unique effects. Each tool delivers a distinct finish, so testing on a small area prior to full application is advisable.
Furthermore, consistency is key. To maintain uniformity across the wall, work in manageable sections, ensuring that the edges blend adequately before the paint dries. Finally, it may be beneficial to use a protective clear coat once the texture paint has dried completely, enhancing both durability and vibrancy. Following these expert tips will help you achieve a flawless finish that elevates your space with stylish texture paint.

Common Mistakes to Avoid
Applying texture paint to walls can be a rewarding process, but it is not without its challenges. Several common mistakes can hinder the desired outcome, making it essential to be aware of them in advance. One significant mistake is inadequate surface preparation. Failing to properly clean and repair the walls can lead to poor adhesion of the texture paint. Before application, ensure that the wall surface is clean, dry, and free from any defects. Using a primer suited to textured finishes can also enhance adhesion and uniformity.
Another frequent error is using improper tools. Many homeowners may opt for brushes or rollers not suited for texture paint. Tools specifically designed for applying texture paint, such as texture rollers or spray guns, provide better results and help achieve a professional finish. Furthermore, applying the texture paint too thickly can cause uneven surfaces and lead to cracking as it dries. It is advisable to apply multiple thin coats, allowing each to dry fully before adding another layer.
Timing during application is crucial as well. One common mistake is not working in sections, which can result in visible lines where the texture paint overlaps. Instead, break the wall into manageable sections, applying the paint consistently within these areas before moving on. Additionally, failing to choose the right texture finish for the room can lead to unsatisfactory results. Consider the room’s purpose and ambiance when selecting a texture, as heavier textures may overwhelm smaller spaces while lighter textures may enhance them.
Finally, neglecting proper cleanup can leave you with unwanted paint splatters and a disorganized workspace. Take the time to cover floors and furniture adequately to prevent damage during the application process. By being mindful of these common mistakes, you can significantly increase your chances of a successful texture painting project.
Maintaining and Caring for Texture Painted Walls
Texture painted walls enhance the aesthetic appeal of a space, but they also require specific maintenance to ensure their longevity and visual quality. Regular care is essential for preserving the integrity of the texture and preventing deterioration. The first step in maintaining these walls is to establish a cleaning routine. Using a soft, dry cloth or a duster can effectively remove dust and cobwebs without compromising the texture. For deeper cleaning, a damp sponge with mild soap can be used—make sure to wring out excess moisture to avoid saturating the paint. Rubbing too harshly can damage the texture, so always opt for gentle motions.
It is advisable to avoid abrasive cleansers or scouring pads, as these may harm the texture finish. If a stain occurs, it is best to treat it as soon as possible with a suitable cleaner; however, always test any product on an inconspicuous area first. In addition to cleaning, monitoring the texture painted surface for any signs of wear or damage is important. Areas prone to impact, such as corners and edges, are particularly vulnerable and may require touch-ups. When assessing these areas, look for any cracks, chips, or fading that might necessitate repainting or retouching.
Reapplication of texture paint may be necessary over time, especially in high-traffic areas where the walls are subjected to more wear and tear. If the texture starts to lose its visual appeal or if more extensive damage occurs, it’s wise to consider a complete reapplication. In summary, maintaining texture painted walls involves regular dusting, careful cleaning, and prompt attention to any damages. This dedicated care ensures that the textured finish remains not only beautiful but also functional for many years. By incorporating these practices, homeowners can enjoy the lasting benefits of their texture painted walls.
Conclusion and Final Thoughts
In summary, the application of texture paint on walls presents numerous opportunities for enhancing the aesthetic appeal of any living space. Throughout this guide, we have explored various types of texture paint, including their unique characteristics and the benefits that each type can provide. From traditional techniques like stucco and knockdown to modern variations such as sponge and metallic finishes, the possibilities for customization are extensive.
One significant advantage of texture paint is its ability to disguise imperfections on walls, providing a more polished and refined appearance. Additionally, texture paint can add depth and dimension to a room, creating an inviting atmosphere that reflects personal style. It is important to note that while the process of applying texture paint can seem daunting, with careful preparation and the right tools, any homeowner can achieve professional-looking results.
As readers embark on their painting projects, it is advisable to experiment with different techniques and color combinations. Combining textures and finishes can result in a unique and personalized design that transforms standard walls into eye-catching focal points. To further elevate the application process, consider taking a workshop or watching tutorial videos online, which can provide valuable insights and tips for achieving a flawless finish.
Ultimately, applying texture paint can be a rewarding and fulfilling home improvement task. With a little creativity and confidence, homeowners can craft beautiful, textured walls that enhance the overall aesthetic of their spaces. Embrace the journey of transforming your walls and let texture paint be the medium through which your artistic vision comes to life.